|
|
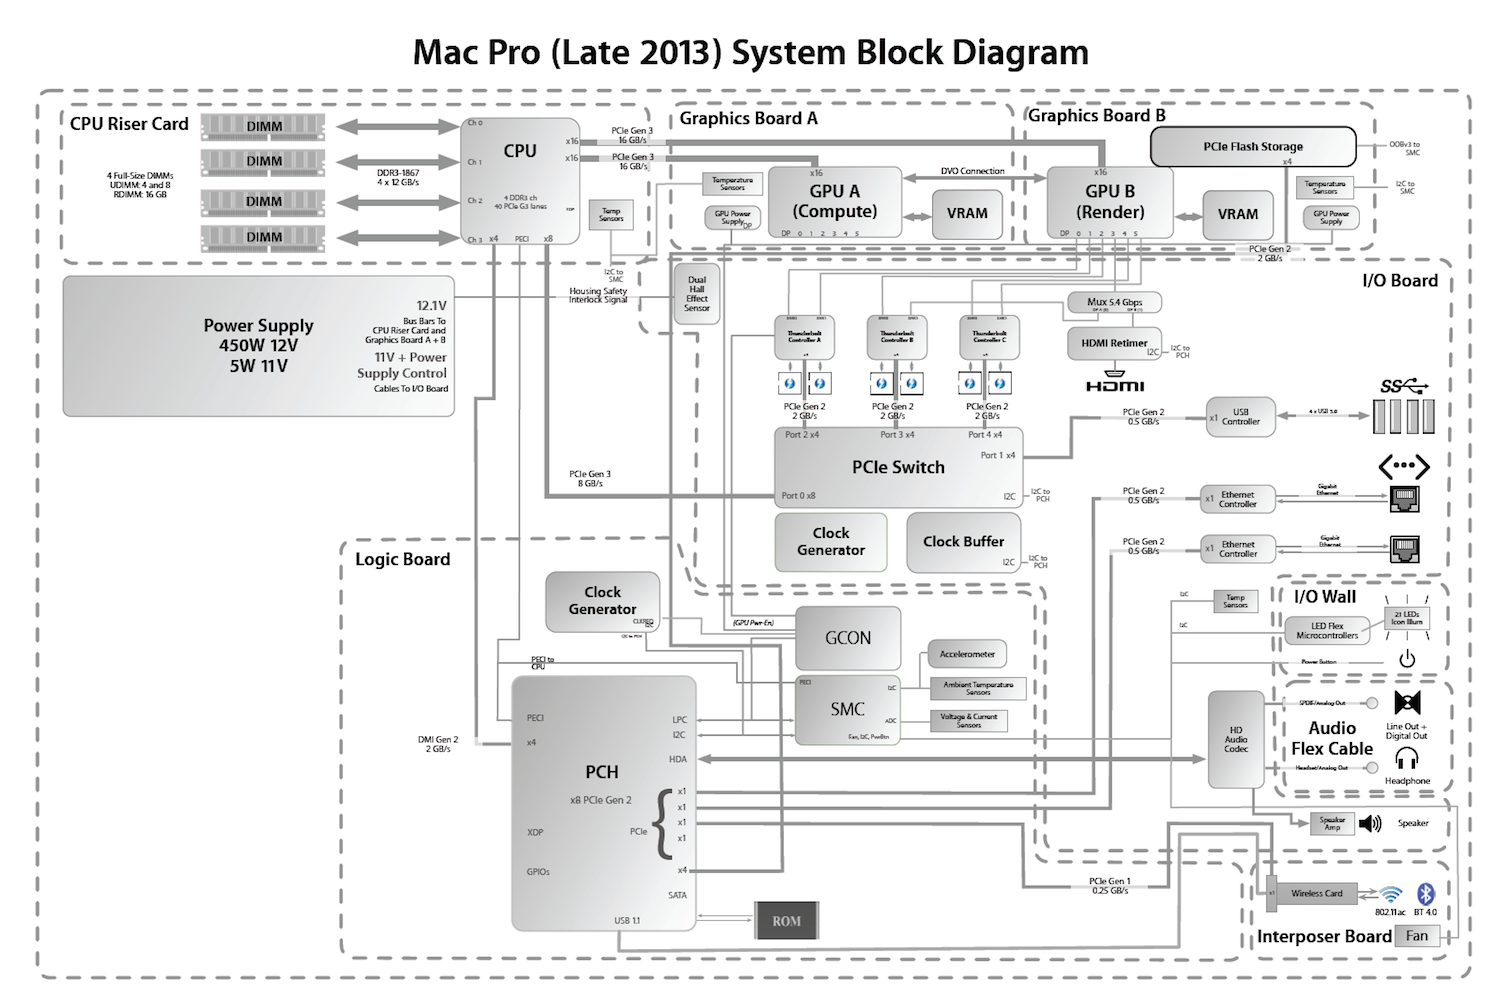
다운로드 ☞ late-2013-mac-pro-system-block-diagram.png
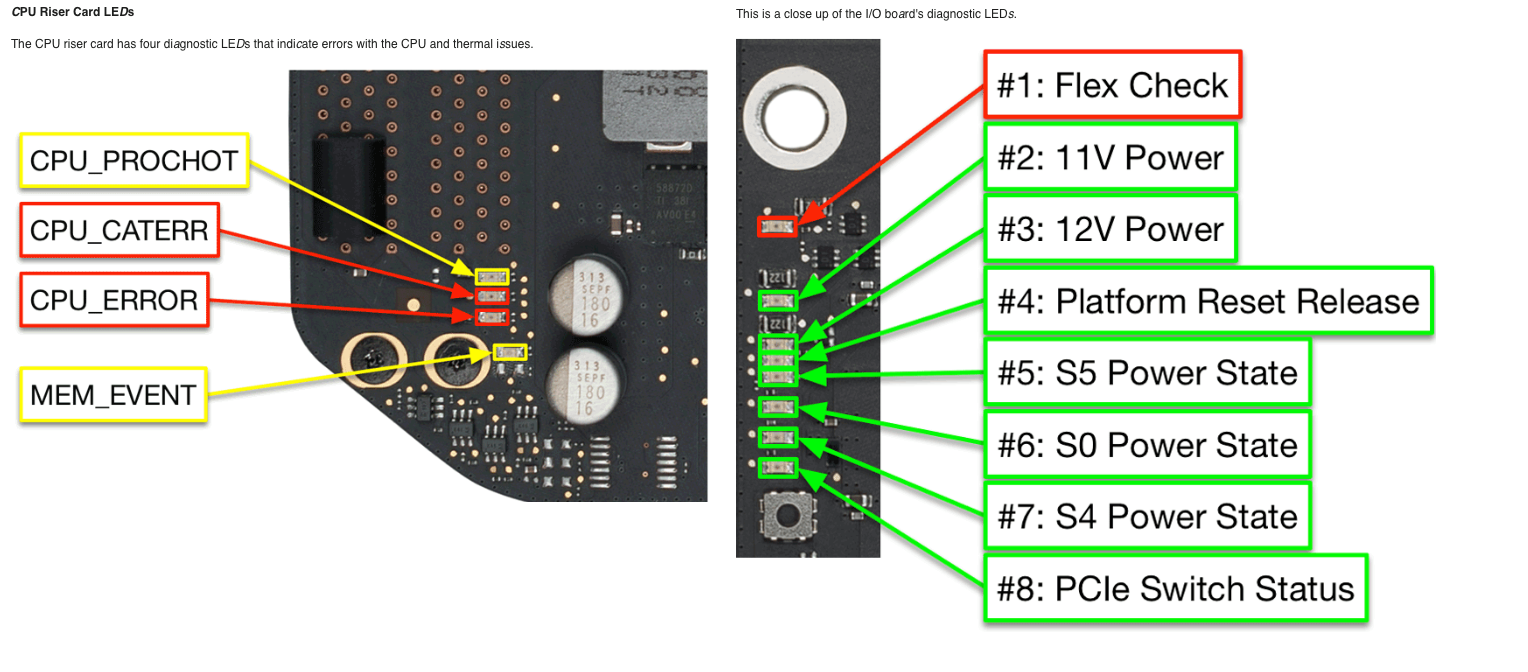
다운로드 ☞ late-2013-mac-pro-system_Indicator.png
※ 자료 설명 ※
The Mac Pro (Late 2013) contains several diagnostic LEDs and test points to assist in troubleshooting:
맥 프로(2013년 후반 모델)에는 문제 해결을 돕기 위한 여러 진단 LED와 테스트 포인트가 있습니다.
Status LEDs are green, and do not illuminate unless the DIAG button (refer to the I/O Board LEDs topic) on the I/O board is being pressed. This type of LED is only found on the I/O board. They are used to identify power states and are useful in troubleshooting the startup sequence.
상태 LED는 녹색이며, I/O 보드의 DIAG 버튼(I/O 보드 LED 항목 참조)을 누르지 않으면 켜지지 않습니다. 이 LED는 I/O 보드에만 있으며, 전원 상태를 나타내는 데 사용되어 시동 과정 문제를 해결하는 데 유용합니다.
Error LEDs are red, and illuminate continuously when there is a problem.
오류 LED는 빨간색이며, 문제가 발생하면 계속 켜져 있습니다.
Warning LEDs are yellow, and illuminate continuously when a thermal problem is detected. This type of LED is only found on the CPU riser card.
경고 LED는 노란색이며, 발열 문제가 감지되면 계속 켜집니다. 이러한 종류의 LED는 CPU 라이저 카드에만 있습니다.
Using Diagnostic LEDs for Troubleshooting The Mac Pro (Late 2013) contains a Hall Effect sensor that will prevent operation of the computer with the housing removed. For the purpose of viewing diagnostic LEDs only, it is possible to briefly operate the computer with the housing removed.
진단 LED를 이용한 문제 해결 Mac Pro(2013년 후반 모델)에는 홀 효과 센서가 내장되어 있어 케이스를 제거하면 컴퓨터 작동이 불가능합니다. 진단 LED를 확인하기 위한 목적으로만 케이스를 제거한 상태에서 잠시 컴퓨터를 작동시킬 수 있습니다.
From the Apple menu, choose Shut Down (or if the computer is not responding, hold the power button until it turns off). Remove the AC power cord and all cables and peripherals that might be connected to the system. Remove the housing. Connect the AC power cord. Warning: To prevent injury, avoid contact with the bus bars and the bus bar screws (shown below) when the computer is plugged in and powered on. The bus bars and the bus bar screws, located at the top of the main boards, have enough energy to cause a burn if they are bridged with metal (such as a ring or other jewelry). Avoid contact with I/O board bus bars and bus bar screws:
Apple 메뉴에서 종료를 선택하십시오(컴퓨터가 응답하지 않으면 전원 버튼을 길게 눌러 꺼질 때까지 기다리십시오). AC 전원 코드와 시스템에 연결되어 있을 수 있는 모든 케이블 및 주변 장치를 분리하십시오. 본체를 분리하십시오. AC 전원 코드를 연결하십시오. 경고: 부상을 방지하기 위해 컴퓨터가 전원에 연결되어 있고 전원이 켜져 있는 동안 버스 바와 버스 바 나사(아래 그림 참조)에 접촉하지 않도록 하십시오. 메인 보드 상단에 있는 버스 바와 버스 바 나사는 금속(반지 또는 기타 장신구 등)과 접촉할 경우 화상을 입을 수 있을 만큼 강력합니다. I/O 보드 버스 바와 버스 바 나사에 접촉하지 않도록 하십시오.
I/O Board Error LED
I/O 보드 오류 LED
#1: Flex Check: This indicates that there is a connection issue between the logic board and the I/O board. Check the mezzanine connectors on both the logic board and I/O board to be sure the connections are fully seated.
#1: 플렉스 체크: 이는 로직 보드와 I/O 보드 간의 연결에 문제가 있음을 나타냅니다. 로직 보드와 I/O 보드의 메자닌 커넥터가 완전히 연결되어 있는지 확인하십시오.
I/O Board Status LEDs
#2: 11V Power: This indicates 11V power from the power supply. It should remain illuminated whenever AC power is connected.
#2: 11V 전원: 전원 공급 장치에서 11V 전원이 공급됨을 나타냅니다. AC 전원이 연결되어 있는 동안에는 계속 켜져 있어야 합니다.
#3: 12V Power: This indicates 12V main system power. It should illuminate once the power button has been pressed, and should remain on while the system is powered on and not in sleep mode. If high-power USB or Thunderbolt devices are connected prior to sleep, this LED will remain illuminated during sleep.
#3: 12V 전원: 이 표시등은 12V 주 시스템 전원을 나타냅니다. 전원 버튼을 누르면 켜지고, 시스템 전원이 켜져 있는 동안(절전 모드가 아닌 경우) 계속 켜져 있어야 합니다. 절전 모드 진입 전에 고출력 USB 또는 Thunderbolt 장치를 연결하면 절전 모드 중에도 이 LED가 계속 켜져 있습니다.
#4: Platform Reset Release: This indicates that the system has transitioned to a fully running power state (S0). During startup, this indicates that the system can transition to EFI Boot.
#4: 플랫폼 재설정 해제: 이는 시스템이 완전히 작동 중인 전원 상태(S0)로 전환되었음을 나타냅니다. 시작 시, 이는 시스템이 EFI 부팅으로 전환될 수 있음을 의미합니다.
#5: S5 Power State: This indicates that the S5 (soft power off) state is available. It will illuminate at all power states, until the computer is fully shut down. If the computer is scheduled to turn on at a certain time in the Energy Saver preference pane, this LED will still illuminate after the computer has been shut down.
#5: S5 전원 상태: 이 표시등은 S5(소프트 전원 끄기) 상태를 사용할 수 있음을 나타냅니다. 컴퓨터가 완전히 종료될 때까지 모든 전원 상태에서 켜집니다. 에너지 절약 환경 설정에서 특정 시간에 컴퓨터가 켜지도록 예약된 경우, 컴퓨터가 완전히 종료된 후에도 이 LED는 계속 켜져 있습니다.
#6: S0 Power State: This indicates that the S0 (full power) state is available. It will illuminate once the computer begins the startup sequence, but does not necessarily indicate that computer has successfully started up.
#6: S0 전원 상태: S0(최대 전력) 상태를 사용할 수 있음을 나타냅니다. 컴퓨터가 시작 시퀀스를 시작하면 켜지지만, 컴퓨터가 성공적으로 시작되었음을 반드시 의미하는 것은 아닙니다.
#7: S4 Power State: This indicates that the S4 (hibernate) state is available. It should illuminate at the same time as the S0 LED. If, during startup, this LED illuminates without S0 illuminating, it may indicate an issue.
#7: S4 전원 상태: 이 LED는 S4(최대 절전) 상태를 사용할 수 있음을 나타냅니다. S0 LED와 동시에 켜져야 합니다. 시작 시 S0 LED가 켜지지 않고 이 LED만 켜지는 경우 문제가 있을 수 있습니다.
#8: PCIe Switch Status: This indicates the status of the link from the PCIe switch on the I/O Board to the CPU. During startup, this indicates that the system has reached EFI Boot. If the link to the PCIe switch is not operating in PCIe v3 mode, this LED will blink. A fast blink indicates v2 mode, while a slow blink indicates v1 mode. These states may correlate to issues with Thunderbolt or USB devices. Important: Be sure to remove any magnetic source used in step 6 (above) to re-enable the safety interlock circuit as soon as possible, to minimize risk of injury from contact with the bus bars and bus bar screws.
#8: PCIe 스위치 상태: 이 LED는 I/O 보드의 PCIe 스위치와 CPU 간의 링크 상태를 나타냅니다. 부팅 시에는 시스템이 EFI 부팅 단계에 도달했음을 나타냅니다. PCIe 스위치와의 링크가 PCIe v3 모드로 작동하지 않으면 이 LED가 깜빡입니다. 빠르게 깜빡이면 v2 모드, 느리게 깜빡이면 v1 모드입니다. 이러한 상태는 Thunderbolt 또는 USB 장치 관련 문제와 관련이 있을 수 있습니다. 중요: 버스 바 및 버스 바 나사와의 접촉으로 인한 부상 위험을 최소화하기 위해, 안전 인터록 회로를 다시 활성화하기 위해 6단계(위 참조)에서 사용한 자성체를 가능한 한 빨리 제거하십시오.
-출처-
https://logi.wiki/index.php/Mac_Pro_6,1_Late_2013_Diagnostic_LEDs


|


